 Written June 24, 2011 (addition August 2016 below)
Chris:
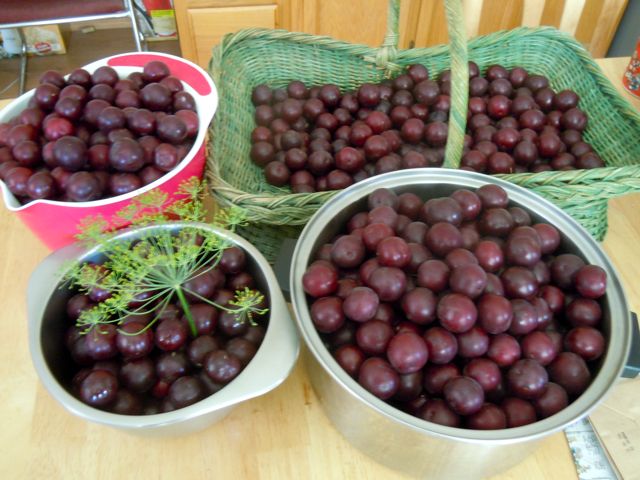
Even slower than last year, it took April, May, and half of June before the Valley heated up the way it should. So I’m not surprised that the purple jewels are behind, even more behind than last year. By June 22 in 2010, I had harvested a few hundred ripe ones from the tree in our yard and from the third of the neighbor’s tree that hangs over our back fence. I had help–my daughter Ann Louise, who was visiting, then young co-worker Elliott and his wife Elise. A big bucket two-thirds full of little round fruit just bursting with tart-sweet flavor. Not super sweet like bing or rainier cherries, but tarter, like baking cherries. Elliott, a gardener and cook, to whom I gave half the pickings, kept asking, “Are you sure they’re cherries?”
I, too, had doubts from the very start. They were the size of cherries, and the pits were like cherry pits, but they were not as solidly meaty as cherries and they were juicier. And the juice was sweet and sour, and when you bit into the fruit, the skin seemed like…and the juice squirted like…a little plum. You know, sort of like the round, red kind about the size of a tennis ball—but these were lots smaller and darker—but not at all like the little Italian purple plums that turn into prunes.
Now, if you had a cherry that acted like a plum, or vice versa, what would you call it? That’s right. So I googled “cherry plum,” and knew what I had.
Now cherry plums won’t lose their sourness as they ripen. That’s who they are: citrusy sour with a nice sugary promise. You can eat them off the tree or from a bowl if you like, but expect to pucker, a lot. I guarantee that your dinner guests won’t like them, unless they’re adventurous eaters.
So why pick them at all—other than perhaps to keep your garden floor from getting covered in splatted little plums in July and August, when they fall, overripe? Pick them because they make an absolutely stupendous cherry plum jam. More on that later.
Right now I want to rhapsodize on the picking itself. What’s so much fun is how the little buggers hide. Well, they don’t hide exactly, but the tree does nothing to make them stand out. Imagine this: a purple tree, well sort of maroonish purple, like a Japanese maple, but with little leaves that curl, so the curled leaf looks like the little plum and the little plum looks like the leaf. The first, or even the second, or even the third time you look at a branch, trying to find the plums, you won’t see them. Or you’ll grab at a leaf because you think you see a plum. Finally you’ll see them—aha!—and you’ll grab its smooth, plump surface and pull it easily, with a snap, from the twig. Then gradually you’ll see another and a few more and suddenly you’ll see clusters where you thought there were only leaves. And you’ll pick them steadily, still being fooled sometimes by leaves, until you’re sure that no more plums could possibly be found in that part of the tree. But tomorrow, or the next day, as you pass under a branch on your way to pull a creeping vine from your fuchsia, you’ll look up to see more plums. Not new ones, you know, but ones you missed.
Adding to the fun, of course, is being old and not really enjoying anymore climbing ladders into fruit trees. Oh, who am I kidding? I feel like the boy in Frost’s poem swinging birches or like my own self as a kid hoisting myself limb by stout limb into Mark Diamond’s willow tree and looking down with a bird’s eye view. Nowadays, that bird’s eye view is from four rungs up, not high enough to even hoist myself onto the lowest branch, but it feels high to me at 63, and what I like best is to be surrounded by plum branches, cooled on a hot June day, and peer at the light filtered through a bright screen of purple leaves, shadows and beams flickering in the breeze, and—aha!—another cluster of purple pearls magically appearing where none had been the moment before.
Now, about that jam:
Step 1: Since the cherry plums are bing size or a bit larger, you can use a cherry pitter on most of them to pluck out the pits. Beware of spurting juice—wear an apron or old clothes and rinse your hands frequently. Any plums too big for the pitter will need to be sliced and de-pitted by hand. It’s not a quick process, but you’ll get into a rhythm.
Indeed, if you don’t have a pitter, no problem. This year, my pitter broke early in the process. So I just dug into each plum with thumb and fingers and squeezed the pit out, taking care to keep the plum over the bowl and guard against squirts of juice by cupping each plum in my left palm as my right hand dug in.
Step 2: Let the de-pitted plums fall into a nice big bowl, so the juice won’t get lost. You’ll gradually accumulate a big pile of skins, meat, and juice. Note: The pits you place in another saucepan and set aside–you’ll come back to them.
Step 3: Now place your saucepan with the plum mixture (I had so many I used a large souppot) on low heat and watch the plum mixture as it cooks down, stirring as much as you need to to keep the mix from sticking to the sides as the mixture thickens.
Step 4: Remember, these little guys are more sour than sweet, so you’ll need to add sugar or other sweetener to taste. (I like to add other fruit juices, like apple or grape, along with about a cup of sugar, to my largest pot, which holds at least 400 little plums.) As the mixture cooks down, taste the syrup and see if you need more sweetener. I don’t like mine too sweet; I’d much rather have the fruit flavors dominate.
It’s also your choice if you want to add pectin for thickening. Again, how much you add depends on how thick you want your jam. I put a small package in a mix of 200-300 plums last year, and the jam was more syrupy than your usual store-bought version, but not runny, especially because you keep the jam refrigerated after cooking.
This year I didn’t use pectin and kept all the skins in the mixture. I cooked the mixture for about 90 minutes and the result was excellent in texture, the skins soft, the juice syrupy when cooled.

Step 5: As the mixture cooks down (it’ll take at least an hour on low heat), the skins will come away from the plums. Old-time preservers often kept the skins in the mix, as I did this year; your choice. Last year, I plucked them all out with tongs, and the results were great. But the skins-in version this year may be even better.
Step 6: Remember those pits? You can’t get all the meat and juice off in the pitting process, so you’ll want to add a couple cups of water to the saucepan in which you saved them, bring the mix to a boil, and let it boil for about 15 minutes, enough time for the pits to blanch and the meat and juice to separate off into the water. Then scoop out the pits with a slotted spoon and discard them. Pour the meat and juice mix into the rest of the plums and keep cooking on low heat.
Step 7: Last year’s product filled two 10-ounce jars and one 30-ounce jar, 50 ounces in all, and with regular refrigeration, we had plum jam for ten months—or until the new plums were on the tree and almost ready for harvesting! Some we gave away in small jars and the folks we treated loved the product. My daughter Irene made original labels for the 10-ounce jars. She called one “Plumderful” and the other “It’s a Plum!” I don’t know what the names will be this year, but the jam will again be an inspiration.
This year’s skins-in version made lots more: about 160 ounces divided among jars of different sizes, some for eating and gifting, a few for freezing. For me, the great fun of this adventure is feeling all year long, as I spoon the purple delight onto my toast, the memories of the good times that went into the making. What a miracle that all this bounty comes from these silent gems that do their best to hide in the garden just above your head.
Addition, August 2016

Six years into the jamming and still going strong. After our more abundant rains in the 2015-16 season, this year’s crop of cherry plums was our best yet. I plucked more than 600 from our side-yard tree, and didn’t have to get above rung three on the step ladder. (Last year, with meager rain, we had our worst crop–only 200 from the entire tree up to rung four!)
I’m happy to say that the cooking method described above is still producing delicious jam. I gave up trying to use the cherry pitter two years ago–just a bit too narrow for these little plump plums. But finger and thumb plucking the pits works just fine, and practice improves efficiency. Just be sure to take a short break in mid-pitting if your back starts to ache. This isn’t an endurance test or a race. Give yourself a half a day at least for the whole process, from pitting to cooking to canning.
About canning (or, more accurately, jarring): Jean uses 8-ounce Ball jars with their tight-seal lids and follows the instructions for boiling and sealing. This process ensures that the “Plumderful” can be kept in the pantry indefinitely until the seal is broken. Once the jar is opened, keep refrigerated. We’ve found it’s best to use up the jam in an opened jar in no more than a couple of months, as the contents will eventually get moldy. That’s why it’s a good idea to use small jars rather than jars more appropriate for pasta sauce.
We’ve also had good luck freezing jam jars that are not vacuum sealed. We’ve kept jars for a couple of years this way. Once thawed, the jam keeps its texture and is still full of flavor.
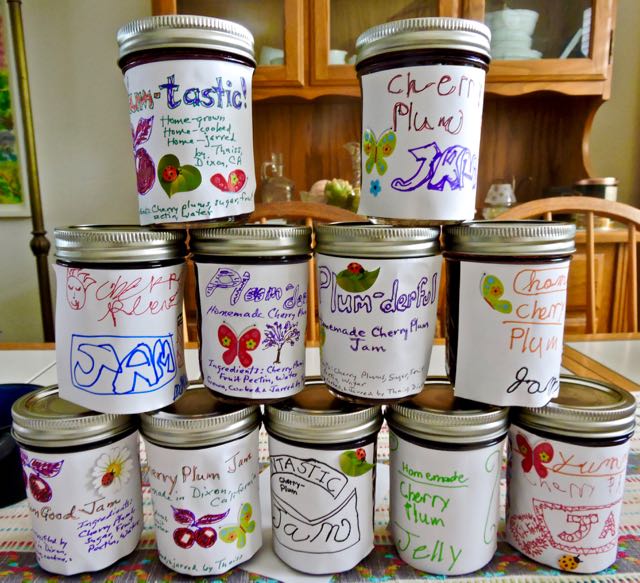
And, oh yes, there’s nothing more fun than labelling the jars, especially if you have a grandchild to help you, as I did this year, with grandson Adrian.

__________________________________________
C Is Also for Coffee
September 10, 2016
Jean
Coffee interests me in several ways besides being a bracing hot drink that pairs with my favorite breakfast pastries. (I’m trying not to get distracted thinking about those, despite having just watched an episode on the Cooking Channel dealing with Parisian pastry shops.)
Chris is making a fresh pot of coffee right now. Decaf actually, since neither of us needs the electrical jolt of caffeine, even first thing in the morning. I can’t wait to smell the aroma wafting through the house. First, though, I cleaned out the grounds from our last pot by taking them to the garden. The first way in which I am interested in coffee other than as a drink is as a soil enhancer. Coffee is expensive; I figure we might as well get all the benefits we can from it, and Starbucks has long pushed the benefits of its grounds in the garden. In fact, I like to pick up large bags of used grounds at our local Starbucks to spread not only under the trees and around the flowers but also around the foundation of the house. The last time I was at our Starbucks, however, they had rearranged things a bit and done away with the basket in the corner that held the bags of grounds. I’ll have to ask them about that. Maybe I can get some under the counter.
I was somewhat skeptical about the value of coffee grounds at first, so I’ve done a little investigation. Overall, the reviews are quite positive. You can read some of the facts and opinions at sites like these:
Let me first say that I love barbecue sauces of almost all kinds. Coming from Kansas City, my favorite has long been that dark, spicy, sweet and sour K.C. sauce. Chris, however, has always complained about “sweet” barbecue sauces, even when the balance of sweet with sour is quite complex. He claimed to like only the vinegar and mustard based sauces but those can be a bit too puckery for my taste. Actually, he can do without the sauce entirely, preferring dry rubs most of all. I get his point, but I do regret giving up that gooey sauce that gets all over your fingers (and chin, in my case) and mixes so well with the beans on the side.
I have finally realized that the answer to this dilemma is a coffee based barbecue sauce. I’ve tried a couple of different recipes, and they are just delicious. You can get that unctuous, sticky, carmelized coating on the ribs or whatever meat you are using without it tasting either sweet or sour. It’s just simply full-flavored and seriously delicious–umami, if you will. (See our post, “D Is for Dirt,” for another take on umami.)
Here are a few of my favorite recipes, although of course, I take liberties with the recipes when I feel like it. (I might feel like adding a little chocolate to take it in that mocha direction! You can make it spicy like mole as well.) These recipes are basically simple, no long list of spices and ingredients like some barbecue sauces. So long as that coffee flavor comes through, you’re gold. Have fun with it.
One final touch that really sent my coffee ribs over the top for Chris was a sprinkle of finishing salt–specifically, a dark, smoked salt I got in some packet of specialty salts, but you could use a different chunky salt.
http://abc.go.com/shows/the-chew/recipes/Coffee-Barbecue-Chicken-The-Chew
http://www.foodnetwork.com/recipes/paula-deen/michaels-coffee-braised-short-ribs-recipe.html
http://www.foodnetwork.com/recipes/food-network-kitchens/chile-coffee-bbq-sauce-recipe.html
